Debugging Netvirt/Networking-odl Port Status Update

Recent versions of Opendaylight Netvirt support dynamic update of Neutron port status via websocket and the networking-odl ML2 plugin knows how to take advantage of this feature. The following is a basic description of the internals of this feature followed by a guide for how to debug it.

How Port Status Update Works

When Neutron/networking-odl boots it registers a websocket based subscription to all neutron ports in the ODL operational yang model.  Once this websocket subscription is connected, networking-odl receives json based notifications for every time Netvirt changes the status of a port. Note that for now this only happens at the time of port binding, if a port should go down, e.g., the VM crashes, Netvirt will not update the port status.

How to Debug Port Status

0) BEFORE YOU GET STARTED, SET THE LOG LEVELS

Neutron logs need to be set to debug. You can do this by having “debug = True” in your neutron.conf, generally under /etc/neutron.

The following ODL component log levels need to be set in <your karaf installation>/etc/org.ops4j.pax.logging.cfg:

log4j2.logger.npcl.level = TRACE
log4j2.logger.npcl.name =org.opendaylight.netvirt.neutronvpn.NeutronPortChangeListener
log4j2.logger.nu.level = DEBUG
log4j2.logger.nu.name =org.opendaylight.netvirt.neutronvpn.api.utils.NeutronUtils 
log4j2.logger.oisah.level = INFO
log4j2.logger.oisah.name =org.opendaylight.genius.interfacemanager.renderer.ovs.statehelpers.OvsInterfaceStateAddHelper

1) Check that the websocket is connected

Websocket connection status is logged in the neutron logs. Check that this line is the last websocket status logged before your port was created:

websocket transition to status ODL_WEBSOCKET_CONNECTED

Note that the connection can disconnect but it should reconnect so you can have multiple lines like this in the log with different statuses. You should be able to follow the transitions in this case.

If the websocket is not connected, either something is wrong with your deployment (firewall blocking 8185?) or ODL is not running.

2) Check whether networking-odl received the port status update

All port status notifications are logged in the neutron logs like this:

Update port for port id <uuid of port> <ACTIVE|DOWN>

Note that for VM ports Netvirt will initially report that the port is DOWN until the basic flows are configured.

If there is no log line like this reporting your port is ACTIVE it is best to…

3) Check whether Netvirt transitioned the port to ACTIVE

Look for the following in karaf.log

writePortStatus: operational port status for <uuid of port> set to <ACTIVE|DOWN>

Again, remember that for VM ports the port is initially reported as DOWN and soon after as ACTIVE.

If this log line is missing…

4) Check whether the Neutron port was received by Netvirt

Adding Port : key: <iid of the port, including uuid>, value=<dump of the port>

If this line is missing it means that something is wrong with the REST communication between networking-odl and ODL.

If this line is present but the line from (3) is not, it probably means that the southbound OpenFlow Port Status event was never received. Now…

5) Check whether the Genius operational port status was created

Check for this:

Adding Interface State to Oper DS for interface <tap interface name>

The tap interface name is the word “tap-” followed by the initial 7 characters of the neutron port’s UUID. If this line is missing, you have confirmed that the southbound port was never received via openflowplugin. This usually means that either the switch is not connected or perhaps the VM never booted.

6) Something deeper is wrong 😦

Although it is unlikely that you will get this far and still not have your answer but if you have, something much deeper is wrong and it’s time for a more serious debugging effort.

OpenDaylight Netvirt Port Bind Flow

When a Neutron port is created, Netvirt programs flows into the OpenvSwitch pipeline to handle packet flows in and out of that port. Netvirt programs these flows as a result of two asynchronous, uncoordinated external events:

  • Networking-odl, the ml2 plugin that words with OpenDaylight, pushes the new port configuration to OpenDaylight’s Neutron feature’s northbound interface
  • The compute node’s virtualization software, e.g., libvirt, adds the VM’s port to OpenvSwitch’s br-int bridge resulting in a notification to OpenDaylight’s Ovsdb feature’s southbound interface

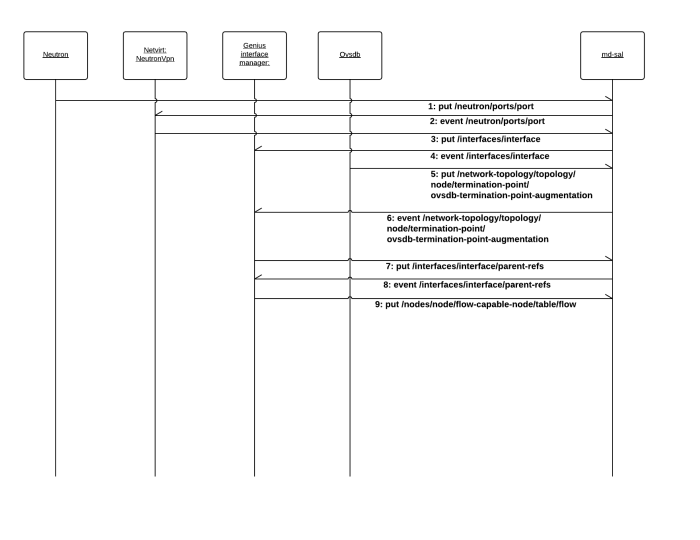
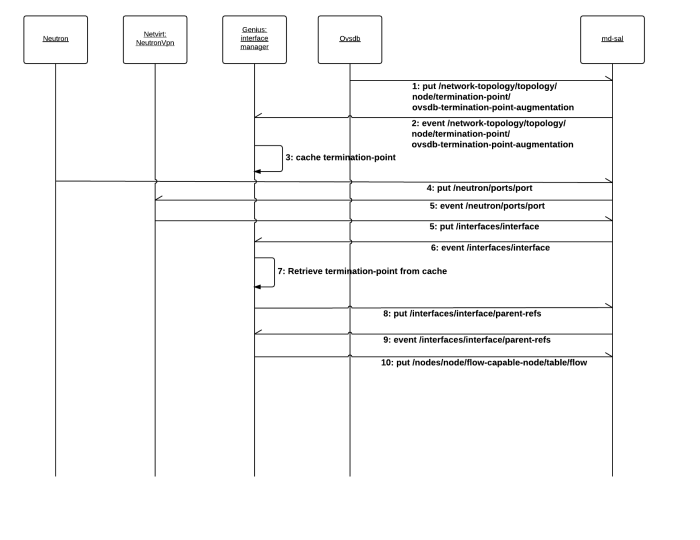
Although Netvirt/Genius programs a bunch of flows for each port this post will focus on the two most basic flows, ingress (table 0) and egress (table 220), and how they are created. This post will show how the various components and md-sal models cooperate and coordinate the two external events, one northbound and one southbound. Since there are two external events being coordinated, those events can arrive in two possible orders, northbound first or southbound first. Let’s examine each of these separately (each arrow is numbered, explanations for each numbered line below the picture).

Northbound Event Arrives First

odl-port-create-seq - nb-first

  1. The networking-odl ml2 plugin updates OpenDaylight’s Neutron feature’s northbound API with the new port, that port is written to the md-sal [1].
  2. The NeutronPortChangeListener (in neutronvpn, there’s a class with this name in a few packages) receives a notification of the new neutron port and…
  3. Writes an interface object to the md-sal [2].
  4. Genius’s interface manager component’s InterfaceConfigListener will receive a notification of the new interface in the md-sal. In this case, the southbound event containing the termination-point md-sal object has not yet occurred. As such, InterfaceConfigListener will search for a cached ovsdb-termination-point and not find it so it will return without configuring the ingress and egress flows. [3]
  5. At some point in the future, the actual port will be added to OpenvSwitch and OpenDaylight Ovsdb will write an ovsdb-termination-point entry to the md-sal.
  6. The TerminationPointStateListener class in interface manager receives a notification of the new ovsdb-termination-point. [4]
  7. At this point, since the interface was already written (3, above) a parent-refs is added below that interface in the md-sal tree. The parent-refs maps the port name added to OpenvSwitch, e.g., tap3914ffc0-42, to the interface object. This provides enough keying and mapping information to construct the desired ingress and egress flows. [4]
  8. InterfaceConfigListener is triggered again…
  9. this time, since the ovsdb-termination-point entry is present, the flows are constructed and written to the md-sal. This, of course, will trigger the OpenFlowPlugin component (not pictured) to push those flows to OpenvSwitch.

Southbound Event Arrives First

odl-port-create-seq - sb-first

  1. In this ordering of events the ovsdb-termination-point arrives first…
  2. TerminationPointStateListener receives the event…
  3. …and saves the object for easy lookup later.
  4. The networking-odl ml2 plugin updates OpenDaylight’s Neutron feature’s northbound API with the new port, that port is written to the md-sal.
  5. The NeutronPortChangeListener (in neutronvpn, there’s a class with this name in a few packages) receives a notification of the new neutron port and writes an interface object to the md-sal [2].
  6. Genius’s interface manager component’s InterfaceConfigListener will receive a notification of the new interface in the md-sal [3].
  7. The ovsdb-termination-point object is retrieved from the cache [3].
  8.  A parent-refs is added below that interface in the md-sal tree. The parent-refs maps the port name added to OpenvSwitch, e.g., tap3914ffc0-42, to the interface object [3].
  9. The write to parent-refs, since it is below the /interfaces/interface object triggers a notification event to the same listener, InterfaceConfigListener [3]…
  10. …which writes the flows!

Footnotes

[1] https://github.com/opendaylight/neutron/blob/stable/carbon/northbound-api/src/main/java/org/opendaylight/neutron/northbound/api/NeutronPortsNorthbound.java#L161

[2] https://github.com/opendaylight/netvirt/blob/stable/carbon/vpnservice/neutronvpn/neutronvpn-impl/src/main/java/org/opendaylight/netvirt/neutronvpn/NeutronPortChangeListener.java#L106

[3] https://github.com/opendaylight/genius/blob/stable/carbon/interfacemanager/interfacemanager-impl/src/main/java/org/opendaylight/genius/interfacemanager/listeners/InterfaceConfigListener.java#L141

[4]https://github.com/opendaylight/genius/blob/stable/carbon/interfacemanager/interfacemanager-impl/src/main/java/org/opendaylight/genius/interfacemanager/listeners/TerminationPointStateListener.java#L83

[5] https://github.com/opendaylight/ovsdb/blob/master/southbound/southbound-api/src/main/yang/ovsdb.yang#L842

Tracing mdsal writes and registrations with mdsal-trace

Why you want to use mdsal-trace

The asynchronous and event-driven nature of OpenDaylight applications present a unique challenge when attempting to comprehend various code paths. In standard, more procedural programming paradigms all one has to do is follow the call stack to understand the chain of events that led to a given piece of code running. However, almost everything that runs in OpenDaylight is triggered by some write to the md-sal that occurred on some other thread, rendering the call stack meaningless.

Modern IDEs have built-in code comprehension features. One simply need click a function name to easily access the places in the code where that function is invoked. However, there is no md-sal equivalent. There is no way to search for places that write to a specific node in the md-sal thereby triggering some Data(Tree)ChangeListener. The opposite is also true, there is no convenient way to see all the places in the code that listen for a specific md-sal change.

What mdsal-trace does

The mdsal-trace tool aims to mitigate these difficulties by logging which code has registered to listen, or which code has modified, any md-sal path. Md-sal’s output looks like this:

2017-05-14 13:47:47,224 | WARN  | Thread-151       | TracingBroker                    | 209 - org.opendaylight.controller.mdsal-trace-dom-impl - 1.6.0.SNAPSHOT | Method "merge" to OPERATIONAL at /NetworkTopology/Topology. Data: [ImmutableLeafNode{nodeIdentifier=(urn:TBD:params:xml:ns:yang:network-topology?revision=2013-10-21)topology-id, value=netvirt:1, attributes={}}] Stack:
 (TracingBroker) org.opendaylight.controller.md.sal.trace.dom.impl.TracingWriteTransaction.recordOp
 (TracingBroker) org.opendaylight.controller.md.sal.trace.dom.impl.TracingWriteTransaction.merge
 (TracingBroker) org.opendaylight.controller.md.sal.binding.impl.BindingDOMWriteTransactionAdapter.ensureParentsByMerge
 (TracingBroker) org.opendaylight.controller.md.sal.binding.impl.AbstractWriteTransaction.put
 (TracingBroker) org.opendaylight.netvirt.statemanager.StateManager.put
 (TracingBroker) org.opendaylight.netvirt.statemanager.StateManager.initializeNetvirtTopology
 (TracingBroker) org.opendaylight.netvirt.statemanager.StateManager.access$100
 (TracingBroker) org.opendaylight.netvirt.statemanager.StateManager$WriteTopology.run
 (TracingBroker) java.lang.Thread.run

Note the parts highlighted red. The first line contains the md-sal node written to (/NetworkTopology/Topology) and the data written (serialized in an internal format but still readable). Under the first line the stack trace leading to the specific md-sal modification. It is relatively straightforward to pick out the relevant line in the call stack.

Mdsal-trace logs listener registrations similarly.

2017-05-14 13:54:55,539 | WARN | rint Extender: 2 | TracingBroker | 209 - org.opendaylight.controller.mdsal-trace-dom-impl - 1.6.0.SNAPSHOT | Registration (registerDataTreeChangeListener) for /Nodes/Node/FlowCapableNode from 
 (TracingBroker) org.opendaylight.controller.md.sal.trace.dom.impl.TracingBroker$1.registerDataTreeChangeListener
 (TracingBroker) org.opendaylight.controller.md.sal.binding.impl.BindingDOMDataTreeChangeServiceAdapter.registerDataTreeChangeListener
 (TracingBroker) org.opendaylight.controller.md.sal.binding.impl.BindingDOMDataBrokerAdapter.registerDataTreeChangeListener
 (TracingBroker) Proxy37fdad2a_6bb1_470c_bdc6_985081631f41.registerDataTreeChangeListener
 (TracingBroker) Proxy62d865d4_b4c8_417f_869a_d3c9846a6812.registerDataTreeChangeListener
 (TracingBroker) org.opendaylight.genius.datastoreutils.AsyncDataTreeChangeListenerBase.registerListener
 (TracingBroker) org.opendaylight.netvirt.natservice.ha.SnatNodeEventListener.init
 (TracingBroker) sun.reflect.NativeMethodAccessorImpl.invoke0
 (TracingBroker) sun.reflect.NativeMethodAccessorImpl.invoke
 (TracingBroker) sun.reflect.DelegatingMethodAccessorImpl.invoke
 (TracingBroker) java.lang.reflect.Method.invoke

A few notes on the log format used

    1. As this is a debugging tool, log messages are printed as WARN so that they are highlighted and easy to spot
    2. Each line, even in the stack traces are tagged with the word “TracingBroker” so that they can be easily grepped
    3. At the point in the code where mdsal-trace runs the canonical yang paths are not available, e.g., “/nodes/node/flow-capable-node.” Instead, generated class names are used, e.g., “/Nodes/Node/FlowCapableNode”
    4. The path representations mentioned in the previous bullet are provided by a special codec that is part of the md-sal infrastructure. However, there are paths this codec can not translate.  Mdsal-trace attempts to reconstruct these paths from various data structures it has available to it. These are rendered like this (the bold highlighted part is the reconstructed path):
    5. <RECONSTRUCTED FROM: "/(urn:opendaylight:genius:lockmanager?revision=2016-04-13)locks/lock/lock">/locks/lock/lock

How mdsal-trace works

Mdsal-trace works as a proxy “bump on the wire” DataBroker that intercepts and logs modifications and registrations. This is all done utilizing blueprint wiring features and there is no need to modify your code to use mdsal-trace.

How to use mdsal-trace

Using mdsal-trace is very easy. First, you need to ensure that your karaf instance has the mdsal-trace features. You can do this by adding the following lines to the karaf project’s pom.xml:

 
<dependency>
  <groupId>org.opendaylight.controller</groupId>
  <artifactId>mdsal-trace-features</artifactId>
  <classifier>features</classifier>
  <type>xml</type>
  <scope>runtime</scope>
  <version>1.6.0-SNAPSHOT</version>
</dependency>

Then install the odl-mdsal-trace feature *before* you install the feature you are working on. For instance, I work on netvirt so my org.apache.karaf.features.cfg has this line in it:

featuresBoot=config,standard,region,package,kar,ssh,management,odl-mdsal-trace,odl-netvirt-openstack

Alternatively, you can manually install the features in the karaf shell using the feature:install command, installing odl-mdsal-trace before the feature containing the code you are working on.

Avoiding log bloat, filtering on yang paths

Since OpenDaylight applications write constantly to the md-sal, turning on mdsal-trace will place a very heavy load on the karaf.log. In order to avoid this, mdsal-trace can be configured to only write log messages pertaining to certain yang paths. This is configured in the initial configuration file located at “./etc/opendaylight/datastore/initial/config/mdsaltrace_config.xml”. After you install odl-mdsal-features all mdsal registrations and modifications will be logged and the mdsaltrace_config.xml file will look like this:

<config xmlns="urn:opendaylight:params:xml:ns:yang:mdsaltrace">
    <!-- <registration-watches>/neutron-router-dpns/router-dpn-list</registration-watches> -->
    <!-- <registration-watches>/tunnels_state/state-tunnel-list</registration-watches> -->
    <!-- <write-watches> /NetworkTopology/Topology</write-watches> -->
</config>

You can add registration-watch and write-watch elements in which case only registrations and modifications to those paths (or below) will be logged (after karaf restart).

OpenDaylight Netvirt DPDK Plumbing, How It All Works Together

From an ODL/Netvirt perspective OVS-DPDK differs from regular OVS at two points during runtime, at the point at which br-int is created and when VMs are brought up. When br-int is created its datapath_type must be set to “netdev.” When guest Vms are brought up the nova “vif_type” must be set to “vhostuser.” Other than these two points, ODL/Netvirt interacts with OVS-DPDK as it would with a regular OVS.  The following delineates the interactions between the various components to achieve the two OVS-DPDK  specific settings at runtime.

Bridge Creation:

  1. At installation time openvswitch is configured to support dpdk.
  2. ovsdb-server connects to ODL and ODL reads the OVSDB “Open_vSwitch” table, including the fact that this OVS supports interfaces of type “dpdk”
  3. After ovsdb-server has connected to ODL, ODL sends OVSDB transactions to create br-int. ODL sets the datapath_type to “netdev” since this OVS has the “dpdk” interface type.
  4. ODL maintains an inventory of all OVS nodes and their bridges in md-sal. This inventory contains the datapath type for each bridge.

Bringing up guest VMs:

  1. Nova -> Neutron: create port. At this time the port’s vif_type is “unbound”
  2. Nova: schedule the VM to a specific host
  3. Nova -> Neutron: update port with hostname of compute node

6.1. Neutron (networking_odl) -> ODL (REST): Retrieve OVS nodes (stored in step 3). Check if the provided hostname’s br-int is of type “netdev”. If it is, update the port with vif_type=”vhostuser” (and vhostuser_socket=”vhu<portid[0:10]>).

6.2 Neutron returns the updated port to Nova

7. Nova spins up the VM via libvirt passing the correct vhost params in the interface definition

Provider Networks in OpenDaylight NetVirt Boron

Introduction

What’s a provider network?

Provider Network [pruhVAHY-der NET-wurk] – noun: In the OpenStack parlance a network that, unlike a tenant network, is generally not managed by OpenStack. Instead, the network exists “out there” and OpenStack simply interfaces with it.

Of course there is more to say about the provider/tenant distinction in OpenStack (see here for more), but from a NetVirt perspective, this definition will suffice. Provider Networks are useful when you need to either access the external world (external network), or if you want to utilize an existing network when forwarding traffic between OpenStack nodes (east/west traffic).

Overview

The best way I know to explain provider networks follows (more or less) the steps used to configure them. As such, this post is structured in the same order.

  • Step 1: Name the provider network and tell each OpenStack node how to connect to it.
  • Step 2: Create the network in OpenStack Neutron.
  • Step 3: Build your OpenStack networking and VMs to use that provider network (however you’ve intended.)

I have included links to configuration files (local.conf) and scripts for running simple provider networks using DevStack and NetVirt Boron. Take a look at that section for basic explanations of the setup and how to use the configs and scripts. I will make reference to these throughout the post at relevant points.

Step 1: Name the provider network and tell each OpenStack node how to connect to it

Unlike tenant networks, provider networks must exist before you get to work with OpenStack. NetVirt Boron supports three ways of connecting to your existing provider network:

  1. Connect to a local interface, e.g., eth0, that is connected to the provider network (most times you’ll just be interested in this option)
  2. Connect to an OpenVSwitch bridge that is connect to the provider network
  3. You can manually configure NetVirt’s “integration bridge”, br-int, with a port connected to the provider network

Internally, all three options are configured per OpenStack node in the OVS Open_vSwitch table’s Other_Config column. You can inspect the value of this column as follows:

$ sudo ovs-vsctl get Open_vSwitch . Other_Config:provider_mappings

The Other_Config column will contain something of the format:

<physnet>:<connector>

In this format, <physnet> is the name you want to give this provider network and <connector> is either (option 1 above) the name of a local interface, (option 2) the name of a bridge on OpenVSwitch, or (option 3) the name of a port already present on br-int.

Obviously, since <connector> may be the name of an interface on the local machine, it may need to be different per OpenStack node.

If you are using DevStack, Other_Config:provider_mappings is configured via the setting “ODL_PROVIDER_MAPPINGS” in local.conf. The networking_odl module will pick that setting up and configure Other_Config:provider_mappings after OVS is brought up.

You can check out local.conf files for my control and compute nodes at [1] and [2].

Step 1 (continued): NetVirt Does the Wiring

When an OVS instance connects to NetVirt, NetVirt will read its Other_Config:provider_mappings field. Remember the three options for connecting to external networks? Because options 2 and 3 (via pre-existing OVS bridge or via existing port on “br-int”) require pre-existing configuration, NetVirt will read that configuration and determine whether <connector> is the name of an interface (option 1), bridge (option 2), or port (option 3). NetVirt will then add additional OVS configuration:

  1. <connector> is the name of a local interface, add it to br-int
  2. <connector> is the name of a bridge on the local OVS, create patch ports to patch it to br-int
  3. <connector> is the name of a port already on br-int, no additional OVS config required

Here’s an example of how the provider network is added to br-int for options 1 and 2 (“ens9” is the <connector> value) :

$ sudo ovs-vsctl show
5695f50c-1d90-4bfe-b90f-b27ed510704f
    Manager "tcp:10.9.8.1:6640"
        is_connected: true
    Bridge br-int
        Controller "tcp:10.9.8.1:6653"
            is_connected: true
        fail_mode: secure
        Port br-int
            Interface br-int
                type: internal
        Port "ens9"
            Interface "ens9"
    ovs_version: "2.5.0"


Step 2: Create the network in OpenStack Neutron

The provider mapping tells NetVirt how to connect to a given provider network, but neutron still needs a network defined which corresponds to that provider network.

Adding an OpenStack neutron provider network is simple from the command line:

$ neutron net-create --provider:network_type vlan --provider:physical_network joshnet --provider:segmentation_id 1010 N1

Note the “–provider:physical_network joshnet”. That’s the <physnet> defined above in Other_Config:provider_mappings. That’s how you tell NetVirt, “this network, it already exists. It’s a provider network. Want to know how to connect to it? Check out the provider_mappings entry for <physnet> (joshnet in this example.)”

The –provider:network_type can be any number of types, but in this example, we use vlan.  Creating this network will cause NetVirt to add the following ingress and egress flows for this network.

$ sudo ovs-ofctl -OOpenFlow13 dump-flows br-int
OFPST_FLOW reply (OF1.3) (xid=0x2):
 ... table=0, ... priority=10,in_port=1,dl_vlan=1010 actions=pop_vlan,write_metadata:0x20000000001/0xffffff0000000001,goto_table:17
 ...
 ... table=220, ... priority=7,reg6=0x200 actions=push_vlan:0x8100,set_field:5106->vlan_vid,output:1

The table:0 flow takes any traffic entering on port 1 tagged as vlan 1010, pops its VLAN header, adds some internal tagging to the metadata (lport=2), and sends the packet to the “dispatcher table” (table:17).

Table:220’s flow checks some internal tagging on reg6, in this case 0x200, which means “send this out the specific provider network.” So, we push a VLAN tag, set the VLAN ID to 1010 (5106-4096=1010, not quite sure why it’s done this way), and send it out port 1.

As with any other neutron network, the provider network will need a subnet definition as well. Because the provider network “already exists,” it is crucial that the subnet IPs and ranges align with the actual IPs and ranges defined for the existing network.

As you add subnets, routers, VMs, etc. to your deployment, these two flows (in tables 0 and 220) will serve as the provider network’s entrance and exit points to the OVS OpenFlow pipeline.

You can check out neutron commands for configuring provider networks in the first few lines of [3] and [4].

Step 3: Build your OpenStack networking and VMs to use that provider network – East/West Traffic

See [3] for the script I used to test this.

Let’s say you want to use your provider network for East/West traffic, meaning, traffic between your OpenStack nodes. All you need to do is add the VMs to the provider network you created.

OpenStack Config View of VMs and Provider Network

                 +-------------------------------+
+---------+      |                               |      +---------+
|         |      |                               |      |         |
|         |      |                               |      |         |
|   VM 1  +------+       Provider Network        +------+   VM 2  |
|         |      |                               |      |         |
|         |      |                               |      |         |
+---------+      |                               |      +---------+
                 |                               |
                 +-------------------------------+

Packets that need to travel from one node to another will always exit the source node via the rule we saw in table:220 and enter the destination node via the flow on table:0, like this:

Flow for a ping from VM 1 to VM 2:

+-----------------------------------------------------+                  +-----------------------------------------------------+
|     NODE 1                                          |                  |  NODE 2                                             |
|                                                     |                  |                                                     |
|                                                     |                  |                                                     |
|                 +------------------+                |                  |                +------------------+                 |
|                 |                  |                |                  |                |                  |                 |
|                 |    OVS br-int    |                |                  |                |    OVS br-int    |                 |
|                 |       flows      |                |                  |                |       flows      |                 |
|  +---------+    |              +---+------+    +--------+          +--------+    +------+---+              |    +---------+  |
|  |         <-------------------+ 0 flow   <----+    |   <----------+   |    <----+ flow 220 <-------------------+         |  |
|  |         |    |              +---+------+    |    +   |          |   |    |    +------+---+              |    |         |  |
|  |   VM 1  |    |                  |           |Provider|          |Provider|           |                  |    |  VM 2   |  |
|  |         |    |                  |           |  NIC   |          |   NIC  |           |                  |    |         |  |
|  |         |    |              +---+------+    |    +   |          |   +    |    +------+---+              |    |         |  |
|  |         +-------------------> 220 flow +---->    |   +---------->   |    +---->  flow 0  +------------------->         |  |
|  +---------+    |              +---+------+    +--------+          +--------+    +------+---+              |    +---------+  |
|                 |                  |                |                  |                |                  |                 |
|                 |                  |                |                  |                |                  |                 |
|                 |                  |                |                  |                |                  |                 |
|                 +------------------+                |                  |                +------------------+                 |
|                                                     |                  |                                                     |
|                                                     |                  |                                                     |
|                                                     |                  |                                                     |
+-----------------------------------------------------+                  +-----------------------------------------------------+

Step 3: Build your OpenStack networking and VMs to use that provider network – External Provider Networks

See [4] for the script I used to test this.

Another use of a provider network is connectivity beyond your OpenStack deployment, for example, to the internet. To do this, you must create an OpenStack configuration that has a router to route your traffic OUT to your provider network (and beyond.) Like this:

+----------------------+
|                      |
|    Provider Net.     |
|                      |
+----------+-----------+
           |
    +------+--------+
    |               |
    |   Router      |
    |               |
    +------+--------+
           |
+----------+------------+
|                       |
|  Internal Network     |
|                       |
+----+-------------+----+
     |             |
+----+----+     +--+------+
|         |     |         |
|  VM 1   |     |  VM N   |
|         |     |         |
+---------+     +---------+

The router must be assigned a default route that is the IP of a router that really exists out on the provider network. You must also configure floating IPs or SNAT to translate the internal network’s IP addresses to something that will work beyond the internal OpenStack network.

Fundamentally, the flows we saw above will function exactly the same way:

+-----------------------------------------------------+
|     NODE 1                                          |
|                                                     |
|                                                     |
|                 +------------------+                |                +------------------------+
|                 |                  |                |                |                        |
|                 |    OVS br+int    |                |                |                        |
|                 |       flows      |                |                |   Provider network     |
|  +---------+    |              +---+------+    +--------+            |   and beyond           |
|  |         <-------------------+ 0 flow   <----+    |   <----------+ |                        |
|  |         |    |              +---+------+    |    +   |            |                        |
|  |   VM 1  |    |                  |           |Provider|            |                        |
|  |         |    |                  |           |  NIC   |            |                        |
|  |         |    |              +---+------+    |    +   |            |                        |
|  |         +-------------------> 220 flow +---->    |   +----------> |                        |
|  +---------+    |              +---+------+    +--------+            |                        |
|                 |                  |                |                |                        |
|                 |                  |                |                |                        |
|                 |                  |                |                |                        |
|                 +------------------+                |                |                        |
|                                                     |                +------------------------+
|                                                     |
|                                                     |
+-----------------------------------------------------+

The router (and floating IPs or NAT) and the internal networks required for the external access are all virtual, and implemented in the OVS OpenFlow flows that lie between our ingress (table:0) and egress (table:220) flows.

 Scripts and Configuration Files

The files below come from my own development environment – Two OpenStack nodes, control and compute, that connect to an OpenDaylight NetVirt controller that runs on my laptop. [1] and [2] are my DevStack local.conf files. I encourage reading these files – they will need to be tweaked to run in your environment.

[1] DevStack local.conf for my control node

[2] DevStack local.conf for my compute node

[3] script for creating east/west provider network

[4] script for creating external provider network

[5] patch to enable flat networks in networking_odl mitaka – as of this writing, networking_odl, the DevStack driver for OpenDaylight, does not support flat provider networks. If you want to use a flat provider network, apply this patch to wherever your DevStack places the networking_odl git clone and then rerun stack.sh.